My photobook came a few days ago. Here are some of the pictures in it that haven’t been on this blog. Also, a gallery view of my photobook.


My photobook came a few days ago. Here are some of the pictures in it that haven’t been on this blog. Also, a gallery view of my photobook.


1. Macro Freedom. July 4, 2012. 7:11pm. F/4.0. 1/2500 sec. Rexburg, Idaho. Canon EOS REBEL T3
2. Freedom. July 4, 2012. 7:11 pm. F/ 4.5. 1/2500 sec. Rexburg, Idaho. Canon EOS REBEL T3


1. Street Lights. June 3, 2012. 10:03 pm. F/8.0. 10 sec. Canon EOS REBEL T3
2. Rings. June 3, 2012. 9:50 pm. F/10. 30 sec. Canon EOS REBEL T3
3. Neon Purple. June 3, 2012. 10:49 pm. F/4.5. 10 sec. Canon EOS REBEL T3
This was an interesting assignment. I’m not a fan of borders around pictures so I was trying to alter the tutorials that I followed to see if I could grow to like them. In the first I just added a simple darker border with lightened opacity by adding a new layer and then rectangle marqueeing around the center and then deleting it. The second I similarly added an elliptical marquee and eyedropped the red color from the original photo. Lastly, the Neon purple I resized to an 8×10 and by changing the imgae to 9×7 and then adding a 1 inch canvas border. I changed the canvas color to black. Created a rectangular white shape. Then added a layer mask to it, added a blur motion filter to get the feathered edges. All in all lots of fun. The last picture I did was of a fine art template. It’s one of my favorite pictures from the whole semester. I made the template with black rectangles and then created a clipping mask. I don’t like my name or signature so I elected to add a title in a complimentary font.


1. Camera Motion. June 3, 2012. 10:48pm. F/8.0. 10 sec. Canon EOS REBEL T3
2. Light Painting. June 3, 2012. 9:19 pm. F/4.5. 20 sec. Canan EOS REBEL T3
3. Light Motion. June 3, 2012. 11:02pm. F/5.0. 10 sec. Canon EOS REBEL T3
This assignment was an absolute blast. Its like recreating what you always did at sleepovers as a kid but this time you actually know what you’re doing. For the first picture I used the oven element to make the star-like shape. I turned it four times and the red hot glow worked wonders. Only slightly upped the saturation to make the red brighter. The second was light painting which was surprisingly difficult. I had to really figure out what I wanted it to look like at the end…but at the beginning. This photo wasn’t edited. The last was light motion which I sat in a spinny computer chair as someone spun me with the self timer and high shutter speed I tried to hold the lights really level and they turned out looking like glow in the dark hula hoops.


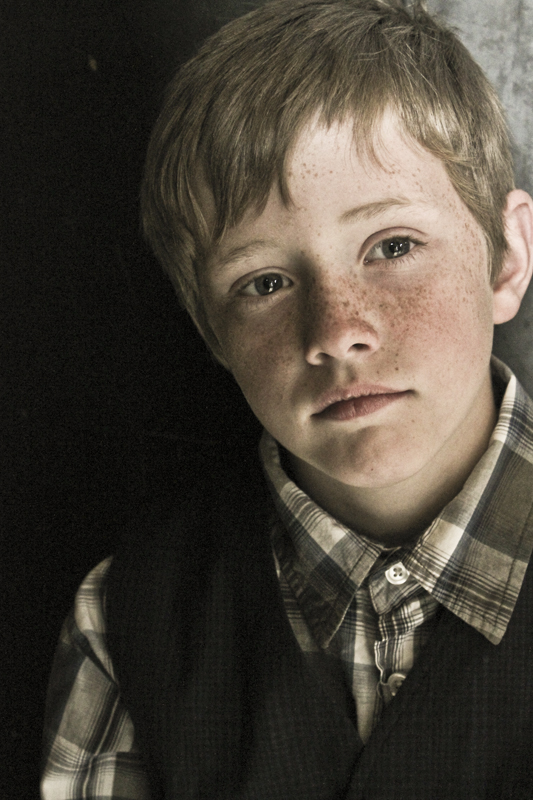


These pictures are all my favorites from Bannack. None are edited too much but all are edited very similarly. Each color photograph has increased saturation, vibrance, black levels, contrast, and a bit of fill light. Whereas the sepia and black and white photos are only those edits–converted to sepia and black and white. These pictures are all my favorite because they illustrate a broad range of personalities and styles within very similar photographs. The first is a landscape picture that looked absolutely beautiful. The picture has slightly exaggerated color and qualities but that is what I remember most when I think back to that image. The next is a portrait of Carly, our model cowgirl who stood by a light window that cast a beautiful light over her face. Next is Sister Esplin, caught in mid-very characteristic, candid laugh. I thought it was a fun picture. Next is the sepia tone of the Boy who looks mischievous. Debonair to be sure but a certain heir of child-like rebellion. Following this the modern day saloon girl, Zoe whose quick poses and easy smile were captured in a fleeting moment of sassy-girl attitude. Next the gangster gunman who took off glasses and hat and flashed a dazzling grin of mischief and wild evilness. Finally, the last picture I deem plot 15 for no other reason than the obvious and it’s ghostly qualities with the clouds reflecting wildly on the windows.


These images were processed using PhotomatixPro4.2.1 and photoshop. They are HDR (High Dynamic Range) images and their purpose is to look quite surreal. The first picture was a 3 stop bracketed pictures where Each shot was 2 exposures apart. The second was a single image that was converted into HDR using the presets in the PhotomatixPro software. That is all the “editing” that was done.


These shots were all done in Macro mode on the camera using the tulip icon. They were slightly saturated in camera raw and then in photoshop I created a macro abstract by blending the images together. I started with the original flower image and then added a solid overlay rusty brown color which darkened and created a nice grungy texture. Then I selected the green pixels from the wood picture and flipped them to create a scraping effect over the whole image. I added another hard light filter for that layer and then was finished.


The pictures above show the use of shallow and deep focus using aperture priority mode. In the first I focused on the barrel in the foreground and the second was the house in the background. Both received minor edits including contrast, saturation, and vibrance.


These two pictures represent blurred action. The first I’m on a merry-go-round with the little boy and the action is blurred because it’s moving at a different speed. However the second picture is blurred action because the model moved out of the frame 2 seconds before the end of the shutter thereby blurring her there and creating a see through image to simulate the appearance of a ghost. The last image is frozen action where the boy was moving on the same merry-go-round but I wasn’t on it with him and with a high shutter speed caught his frozen spinning as he posed willingly.
